Differentiate between SDI and MDI
| MDI |
SDI |
|
Multiple Document Interface
|
Single Document Interface
|
|
It is the type of Graphic User Interface which is able to show more than a single document at a time on the screen.
|
It is a Graphic User Interface which is able to show one document at a time on the screen.
|
| Document can be switched easily in the MDI. |
Task Manager is used to switch between SDI. |
| For maximizing all documents, parent window is maximized. |
In case of SDI it is implementing through special code or task manager. |
| MDI has a parent window, and any number of child windows. |
SDI opens each document in its own primary window. |
| Each child windows share various parts of the parent window's interface including the title bar, menu bar, toolbar. |
Each window has its own title bar, menu bar, toolbar. |
| Web browsers, Visual Studio, Photoshop, Microsoft Excel, Microsoft word |
Notepad, WordPad |
Stability and Performance
SDI applications tend to be more robust and bug-free than MDI applications, since a serious error with one document rarely affects the other documents within an SDI environment. For example, if one Windows Notepad document crashes, any other open copies of Notepad will usually survive the crash. On the other hand, if one Web page in Firefox causes the browser to crash, all the open Web pages die with it.
ListBox Control
The ListBox control is used for presenting the user with a list of options for selection. Depending upon the property of the listbox, users can select one or more items from it.
Some commonly used properties of the ListBox control are:
| SelectedItem |
Contains the selected item from the listbox. |
| SelectedIndex |
Zero based index of the selected item in the listbox. |
| Items |
Collection of all the items in the listbox. Used for adding or removing items from the list using the Add() and Remove() methods. |
Example
Timer
A Timer is used to raise an event at user-defined intervals.
Use of Timer Control
We have to use Timer Object when we want to set an interval between events, periodic checking, to start a process at a fixed time schedule, to increase or decrease the speed in an animation graphics with time schedule etc. A Timer control does not have a visual representation and works as a component in the background.
Timer Tick Event
Timer Tick event occurs when the specified timer interval has elapsed and the timer is enabled.
Timer Interval Property
Timer Interval property gets or sets the time, in milliseconds, before the Tick event is raised relative to the last occurance of the Tick event.
Timer Start Property
Starts raising the Tick event.
Timer Stop Property
Stops raising the Tick event.
Example
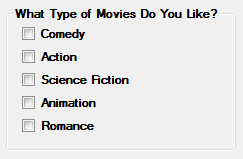
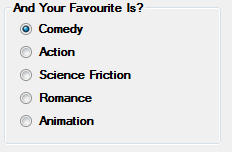
Radio Button & Checkbox
Checkboxes and Radio Buttons are way to offer users choices.
| Checkboxes |
Radio Buttons |
| Checkboxes allow a user to select multiple option from a given set of options. |
Radio Buttons allow a user to select only one option among mutually exclusive options. |
| It appears as a square box. |
It appears as a circle button. |
| Each checkbox is independent of all other checkboxes in the list, so checking one box doesn't uncheck the others. |
Clicking a non-selected radio button will deselect whatever other button was previsously selected in the list. |
 |
 |
The common properties of the control are:
| Name |
The name used to access the control in code. |
| Text |
The text to be displayed along with the checkbox. |
| Checked |
Indicates if the control is in checked state. |
| CheckState |
Determines if the control is checked, unchecked or intermediate (unsure) state. |
The event useful for this control are
| CheckedChanged |
Occurs when the Checked property is changed. |
Example
Label Control
Label control is used to display informative text on the form. For example, we can place a label control beside a textbox to inform the user what she is required to enter in the textbox.
The common properties of the Label control are:
| Name |
The name used to access the control in code. |
| Text |
The caption of the label. |
| ForeColor |
To set the color of the label text. |
| BackColor |
To set the background color of the label. |
| BorderStyle |
To set the border style |
| Font |
To set the style of the font of the label text. |
| Image |
To specify an image to be displayed on the label. |
| Visible |
To decide if the label is visible or not. |
TextBox Control
TextBox control is used to enter the user input. The user can enter text, numbers or special characters in the textbox.
The following are the most commonly used properties of the TextBox control.
| Name |
The name used to access the control in code. |
| Text |
The text to be displayed in the control. |
| BackColor |
To set the background color. |
| ForeColor |
To set the foreground color. |
| Enabled |
To decide if the control is enabled or not. |
| BorderStyle |
To set the style of the border. |
| Visible |
To decide if the control is visible or not |
| MultLine |
To decide if the control can display multiple lines of text. |
| ScrollBars |
To specify if scrollbars will be displayed in a multi line textbox. |
Button Control
The Button control is a very common control that we can find in almost every windows applicaiton. When the user clicks on the button with mouse, some action occurs such as confirmation (OK, Cancel, Retry), saving some data or opening another form.
The important properties of the Button control are
| Name |
The name used to access the control in code. |
| Text |
The caption of the button. |
| BackColor |
To set the background color. |
| ForeColor |
To set the foreground color. |
| Font |
To set the style of the font of the button text. |
| Enabled |
To decide if the button is clickable or not. |
| FlatStyle |
To change the style of the button. |
| Image |
To specify an image to be displayed on the button. |
| Visible |
To decide if the button is visible or not. |
The most important event of the Button control is the Click event. This event occurs when the user clicks the button.
Example
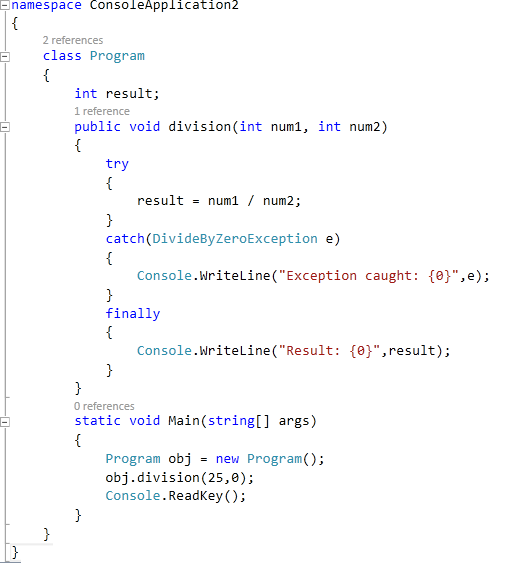
Exception Handling
An exception is a problem that arises during the execution of a program.
These exceptions need to be handle to prevent crashing of program.
C# exception handling is built upon four keywords: try, catch, finally, and throw.
If any exception occurs inside the try block, the control transfers to the appropriate catch block and later to the finally block.
try − A try block identifies a block of code for which particular exceptions is activated. It is followed by one or more catch blocks.
catch − A program catches an exception with an exception handler at the place in a program where you want to handle the problem. The catch keyword indicates the catching of an exception.
finally − If there is no exception occurred inside the try block, the control directly transfers to finally block. We can say that the statements inside the finally block is executed always.
throw − A program throws an exception when a problem shows up. This is done using a throw keyword.
Example
Output

Events
In general terms, an event is something special that is going to happen.
Events are nothing just a user actions such as mouse click, key press, page load, mouse hover etc.
For example
- When you click with the mouse - It is mouse click events.
- When you press any key in keyboard - It is KeyPress events.
- When you refresh your webpage - It is page load events.
- When you move mouse cursor - It is mouse hover events etc.
HOW EVENTS WORK WITH DELEGATES?
When an event raise, it sends a signal to delegates and delegates executes the right function.
WHAT IS PUBLISHER-SUBSCRIBER MODEL?
There are two parts in any event handling program. One part is Publisher that contains definition of events and delegates and other part is Subscriber that accepts the event and provides an event handler.
IMPORTANT FACT ABOUT EVENTS
- An Event is created using event keyword.
- An Event has no return type and it is always void.
- All events are based on delegates.
- All the published events must have listening object.
- All Events should be defined starting with "On" keyword.
Dialogue Box
What is a dialog box?
- Dialog boxes are special forms that are non-resizable, which is used to display messages to the user or make a communication between a computer and its user.
- The simplest type of dialog box is the warning, which displays a message and may require the user to acknowledge that the message has been read, usually by clicking “OK” or "Cancel" (like confirmation for the deletion of a particular record).
- There are standard dialog boxes to open and save a file, print the documents, set the font color for the text, background color, fore color etc.
- A dialog box can also be customized. Such a dialog box is called a custom dialog box.
- Windows.Form is base class.
A dialog box has the following characteristics:
It cannot be minimized, maximized, or restored.
A dialog box does not have any other system button but Close.
It is usually modal, in which case the user is not allowed to continue any other operation on the same application until the dialog box is dismissed.
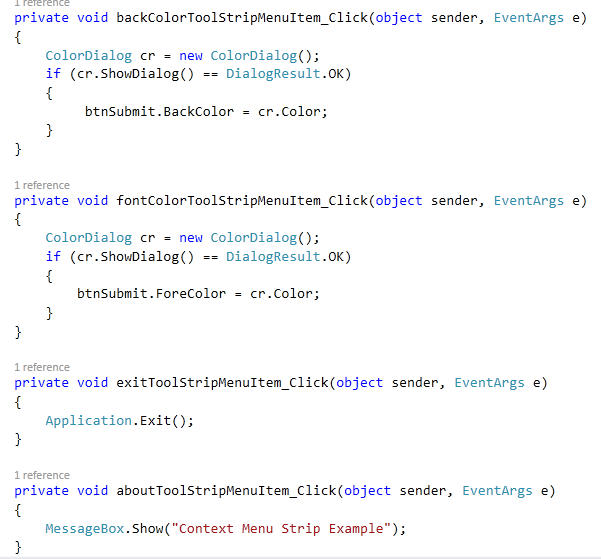
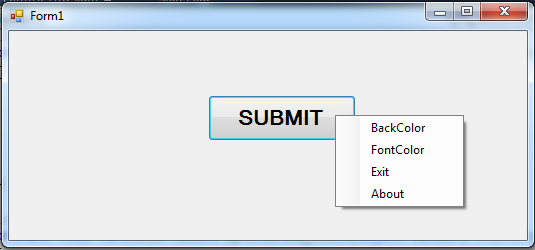
ContextMenuStrip Control / Context Menu
A context menu is also known as a popup menu. A context menu appears when you right click on a Form or on a control.
In the previous versions of .NET, the context menu functionality was provided by the ContextMenu control. In .NET 4.0, the ContextMenu control is replaced with the ContextMenuStrip control.
Creating a Context Menu
To create a ContextMenuStrip control at design-time, you simply drag and drop a ContextMenuStrip control from Toolbox onto a Form in Visual Studio. Once a ContextMenuStrip is on the Form, you can add menu items and set its properties and events.
Example
Output
Graphics and GDI
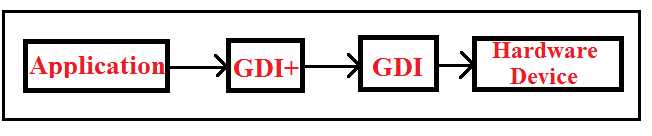
GDI stands for Graphics Device Interface.
GDI is graphics engine in .NET that allows developers to build graphics applications for Windows.
GDI is a set of C++ classes, which sits between the program and the hardware and transfer data from one to other.
- GDI+ is next evolution of GDI.
- The base class for GDI+ is System.Drawing that gives access to the GDI+ graphics system.
- The main purpose of this library is that graphics program is made device independent.
- Graphics is the main class in GDI+ that defines the drawing surface.
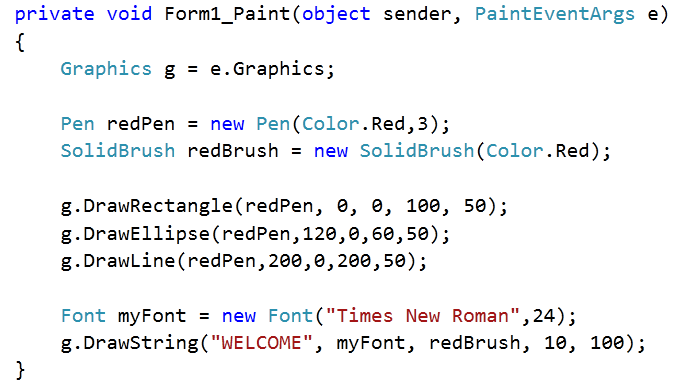
Here are some of Graphics class's methods:
| DrawRectangle |
Draws the outline of a rectangle. |
| DrawEllipse |
Draws an ellipse or circle. |
| DrawPolygon |
Draws the outline of a polygon. |
| DrawPie |
Draws the outline of a pie section. |
| DrawLine |
Draws a line. |
| DrawString |
Draws a string. |
| DrawArc |
This method draws an arc. |
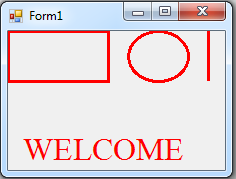
Example
Output
In general, one of the strengths of Windows – and indeed of modern operating systems in general – lies in their ability to abstract the details of particular devices away from the developer. For example, you don't need to understand anything about your hard drive device driver in order to programmatically read and write files to disk; you simply call the appropriate methods in the relevant .NET classes (or in pre-.NET days, the equivalent Windows API functions). This principle is also very true when it comes to drawing. When the computer draws anything to the screen, it does so by sending instructions to the video card telling it what to draw and where. The trouble is that there are many hundreds of different video cards on the market, many of them made by different manufacturers, and most of which have different instruction sets and capabilities. The way you tell one video card to draw, for example a simple line or a character string may involve different instructions from how you would tell a different video card to draw exactly the same thing. If you had to take that into account, and write specific code for each video driver in an application that drew something to the screen, writing the application would be an almost impossible task. Which is why the Windows Graphical Device Interface (GDI) has always been around since the earliest versions of Windows.
GDI hides the differences between the different video cards, so that you simply call the Windows API function to do the specific task, and internally the GDI figures out how to get your particular video card to do whatever it is you want drawn. However, GDI also does something else. You see, most computers have more than one device that output can be sent to. These days you will typically have a monitor, which you access through the video card and you will also have a printer. Some machines may have more than one video card installed, or you may have more than one printer. GDI achieves the remarkable feat of making your printer seem the same as your screen as far as your application is concerned. If you want to print something instead of displaying it, you simply inform the system that the device the output is being sent to is the printer and then call the same API functions in exactly the same way. That's the whole purpose of GDI – to abstract the features of the hardware into a relatively high level API.
Although GDI exposes a relatively high level API to developers, it is still an API that is based on the old Windows API, with C-style functions, and so is not as simple to use as it could be. GDI+ to a large extent sits as a layer between GDI and your application, providing a more intuitive, inheritance-based object model. Although GDI+ is basically a wrapper around GDI, Microsoft have been able through GDI+ to provide new features and claim to have made some performance improvements:
Using GDI objects in earlier versions of Visual Studio was a pain. In Visual Studio .NET, Microsoft has taken care of most of the GDI problems and have made it easy to use.
Form Inheritance
To create consistent windows forms in C# and vb.net, we use Form Inheritance. Form inheritance allows us to reuse the windows form and also to extend the functionality in multiple forms.
To implement Form Inheritance, we create a windows Form (parent form / base form) and inherit forms from the parent form. This is known as Form inheritance. The advantage of using this feature is that when changes are made to the parent / base form, all the inherited forms will automatically adapt the changes.
Since the requirement is to create a similar user interface for all the entry forms, we create a parent/base form that has the common controls and buttons. We can then inherit all the controls from the parent/base form. To provide a meaningful name to the form, set the form name as "ParentForm".
The following are some of the controls in the parent form. After the parent/base form is designed, we can create an inherited form. You can reinforce the topic with the video below.
Upload Image
Validation Control